Dynamic image resizing using Lambda@Edge and CloudFront


Intro
Let's say you have an S3 bucket filled with images and serve your images with CloudFront. Some day you decided to use your distribution for your mobile application. Congratulation you have a small problem. You need to resize your images for your mobile applications. In this article, we'll solve your problem together.
Requirements
S3 & CloudFront Setup
In order to test our scenario, we'll set up a new bucket and distribution.
Let's create a sample s3 bucket.
aws s3api create-bucket \
    --bucket my-bucket \
    --region eu-central-1
Upload a sample image into it
aws s3 cp test.jpeg s3://my-bucket/images/test.jpegNow create CloudFront distribution
aws cloudfront create-distribution \
    --origin-domain-name my-bucket.s3.amazonaws.com
After the distribution creation operation, let's continue with the AWS Console.
In order to configure our distribution correctly, we need to make some changes.
First of all, choose your distribution and check the following items
- Correct origin domain.
- Origin access control settings (recommended)
- Origin access control (If you previously created one, you may use it)
- Click Copy policy button and paste it to "S3 Bucket Policy".
Let's jump to behaviour settings and make sure following settings below
- Viewer protocol policy HTTP to HTTPS
- Allowed HTTP methods GEt, HEAD, OPTIONS
- Restrict viewer access No.
Function Deployment
We'll be going to use a simple lambda function to resize our images. This function is using sharp npm package. Checkout sample function code from the repository
git clone [email protected]:habil/habil-dev-blog.git
cd dynamic-image-resize-lambda-function
Also, you need to check 2 lines in the function code. (index.js)
1- Line 10: make sure your bucket name
2- Line 11: Fit type. This option preserves the aspect ratio. (For more detail please visit this page)
Okay, let's build the project and zip it.
npm i
rm -rf node_modules/sharp
SHARP_IGNORE_GLOBAL_LIBVIPS=1 npm install --arch=x64 --platform=linux --libc=glibc sharp
zip -r function.zip .
Create a role with the following properties
- Trust relationship must include "lambda.amazonaws.com" and "edgelambda.amazonaws.com" services.
- Permissions must include s3 bucket permission. (If you want to use Cloud Watch, you should also include it)
aws lambda create-function \
    --region us-east-1\
    --function-name my-function \
    --runtime nodejs14.x \
    --zip-file fileb://function.zip \
    --handler index.handler \
--role arn:aws:iam::123456789012:role/service-role/previously-created-roleLambda@Edge Deployment
Moreover, we need to deploy our function to the edge. Open your function page on AWS Console. Click Action -> click Deploy to Lambda@Edge.
- Choose your distribution
- Select cache behaviour.
- Select CloudFront event (Viewer Response)
- Confirm deployment to Lambda@Edge.
And deploy your function.
What we have done?
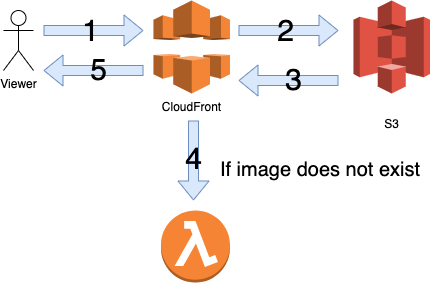
If CloudFront cannot find the requested image in S3 (404 response), our function will run and resize the requested image and return the resized image.
Test
Let's call our image with a custom dimension
https://abcdefgh.cloudfront.net/images/500x500/test.jpegThis request will create a new folder 500x500 in our S3 bucket and return the resized image.
Result
In this article, we have done automatic image resizing using many AWS services. Thanks to the function we used, we automatically resized the pictures and got rid of the manual operation burden.
See you in the next article.


